Le blog de la machine

Posted on

Making Of In Progress

Hello everyone,

The third episode covers the last six months.

I warn you, it’s long!

For those of you just arriving, the first episode on the history of the ultimate machine is here, and the second on makers is here.

January

So I started working on it in January 2024. In the dreariness.

The vague aim was to build a prototype that would demonstrate the living side of the machine, but with a different, unusual shape.

Sunday mechanic

As for the mechanics, there’s no shortage of 3D files. I drew on them to understand the mechanism.

It’s pretty straightforward, you may say, but mechanics isn’t my strong point: during my engineering studies, I remember having to study the plans for a mixer tap for two hours without being able to figure out where the hot water went (on the other hand, I did get ink stains all over the place with my Rotring).

So I fired up the Prusa again and, on January 12, decided to do something I never do: take an online course on Autodesk Fusion. Up until then, I’d been using TinkerCad, but now I felt I had to step up a gear. So I spent about fifteen hours listening to and watching a guy called Nicolasexplainthe various functions of Fusion.

The first results weren’t great, but at least I had some idea of how it was all going to work. And I decided to use just one motor, whereas many boxes have two: one to lift the lid and the other to push back the switch. Initial tests showed me that it was possible to do both with a single motor, while retaining the possibility of creating a language with the opening movements (the living side).

A first attempt at a… strange shape

To escape the traditional box shape, I designed a first prototype that looked, how shall I say… nondescript. I think I’d just figured out how to make revolutionary objects with Fusion.

I painted it yellow, and the arm pink, because there was enough gray outside. You can see it all in this video.

The first problem with this prototype was that the scotch tape holding the lid inevitably provoked the remark “that’s nice, but are you going to keep the scotch there?”.

A second problem arose from the fact that the wires coming out of the box inevitably provoked the remark “but are there going to be all those wires there?”.

Ah, and I’d also started work on a cardboard version, with an idea in the back of my mind.

February

First job: the electronics (the monster)

Following the yellow prototype, it was time to integrate the electronics into the box. I used boards that already contained the components, breakboards that we connected as best we could with small cables, making immoderate use of the glue gun, all the while praying that it would work.

Second project: the first prototype

The next step was to make a real box, with a real lid guaranteed to be tapeless, and which would integrate the electronics, motor, switch and arm.

I opted for brass hinges and tried out some skeuomorphic-inspired sounds – a track later abandoned, but by then I was so happy! You can see it all in action in this video.

March

This first version was “good enough”, as we say in the Yonne, but using brass hinges screwed on and then glued with pistocolle didn’t strike me as an elegant solution. After watching dozens and dozens of tutorials, I finally designed a hinge without brass or glue, in pure plastic. Victory!

I’ve also reworked the circuit board, transforming it from a magma of wires into a somewhat clean card. It’s very easy to do (I use EasyEDA) and very inexpensive to have made.

On this board, you’ll find an rp2040 board, an audio amp, a board that converts the battery’s 3.7V to 5V and a board that charges the battery. The whole thing works well enough for a prototype (i.e. badly).

Here’s what it looks like. It’s better, isn’t it?

In any case, all these efforts have finally resulted in a first prototype that can be shown.

This was immediately followed by another, slightly smaller prototype that would fit the bill perfectly. I was finally able to put all my ideas together in a first video, modestly named“Concepts“.

I had made another video with other sound tests, which you can see here.

My lover then suggested a name for the useless box: la machine. I immediately finalized the logo (well, I found a suitable font for it), registered the trademark “la machine” (since refused) and bought the domain name la-machine.fr.

I’ve also had some badges made. If you’re interested, I’m offering some to the first 20 who let me know!

April

Elium Studio

Elium Studio is a product design agency: it designs Withings products, Freeboxes, subway displays, McDonald’s utensils and a host of other things. I’ve known Pierre Garner for a long time. I wanted Elium to work on the design of the box. After consulting his team, Pierre agreed to the project, and in mid-April, I rang them up for the brief.


The workshops

Remember the cardboard prototype? I had an idea: to use it for workshops with children. Every year, I run a workshop at the Arbalète school in Paris (with my son Armand), during which the children build a small electronic object that they can take home.

Last year, it was a little robot made of plastic cups, which lit up and turned its head when touched. This year, they made a useless box.

Thispaper version had to be designed more seriously. Fortunately, I was familiar with the world of paper toys, since I’d already made (with Marc) cardboard objects with electronics inside. It was called reaDIYmate.

We had to make an electronic board, buy the equipment, bring out the Cricut to cut out the cardboard and test the assembly to make sure it could be done in 3 hours. The result: the kids were able to take their useless box home and, for the nerdiest among them (or their brothers, sisters or parents), reprogram it.

A second opportunity also arose in a kindergarten class where the poetess Séverine Daucourt was in residence. The children composed poems which they said aloud, and the recordings were put “in the box”, so that they could be heard again and again.

Oh, and for the older kids, I teach a course at the WSF on physical design, and this year we had a lot of fun making useless boxes.

Software (seriously)

At the end of April, I had lunch (as I often do) with my friend Paul Guyot. For those who don’t know him, he was the CTO of Violet, the company linked to the Nabaztag. He’s done lots of things since then, but it was he who in 2019 wrote the iconic Nabaztag services in Python for the kit TagTagTag. I showed him the prototype and he offered to help me with the software, which, although it looked simple, needed to be approached professionally.

I had gone for a well-known microcontroller (the rp2040), but it consumes a lot of power when it sleeps. It snores a lot, so to speak. And power consumption is an important issue for the box – I doubt people think about recharging their machine every night. Autonomy is a matter of months. So Paul suggested that I get another processor (an ESP32 C3 for the experts), which has the advantage of consuming very little power when it’s not doing anything. The rp2040 is English, the C3 is Chinese. I don’t know what to make of it.

He’s also encouraged me to use Erlang, but that’s something he recommends for every new project. Erlang is a functional language, close to LISP. LISP was used by AI pioneers such as Marvin Minsky, inventor of the useless box. Do you follow? So, we’re off to Erlang, now all I (and you) have to do is learn it.

Paul has also offered to give a lecture on the machine at the Erlang festival in Berlin in October. If you’re in Berlin on October 20, 2024, come and listen to Paul: the name of the talk is “La Machine: The Useless Box reloaded with Erlang and AtomVM“.

May

Part of May was spent shipping TagTagTag cards from the 2024 production batch. Nothing to do with the machine, although sometimes I feel like I’m making a Nabaztag of sorts again: it’s useless, it plays sounds and there’s something moving.

Friends

I still had time to finalize the appeal to friends of the machine: a video and a first website made with the means at hand, which took me an infinite amount of time. By contacting people interested in the Nabaztag, Minimit and Multiplié, I quickly had 300 friends. Maybe including you.

Interesting

I went to London to attend Russell Davis’ fabulous (vaguely annual) Interesting conference. I took the opportunity to seeEnzo Mari ‘s exhibitionat the Design Museum and visit a few stores to spot what useless electronic gizmos were occupying the market. At Selfridges, I found these Bluetooth speakers with a few keyboard keys and a mini-screen, all for £129.95. I thought, with the machine, I might have a chance.

Electronics (seriously)

It was time to get down to business with the electronics. That’s where Philippe Debadier came in. Philippe Debadier is the engineer who designed the Nabaztag’s electronics long ago, and hundreds of other electronic boards since. He agreed to help me and designed the one for the machine.

The schematic, the routing (routing means going from a theoretical electrical diagram to a real-life board) and the prototypes are complete.

Still to be tested. Thanks Philippe!

June

Elium Studio (again)

On June 17, I had an appointment with Elium for a presentation of the initial work. I’m not going to show you every track. You might prefer others, and now is not the time for doubts.

The design is inspired by Memphis. Not Memphis Tennessee, but the Memphis movement. The Memphis group was founded in the 1980s around the Italian designer Ettore Sottsass (there’s a podcast about him here). It’s a happy coincidence because two years ago, I saw the exhibition devoted to him at the Centre Georges Pompidou and bought the catalog entitled “L’objet Magique“.

Here’s a sneak preview of the machine’s design and possible variations.

Elium also produced a working prototype using the electronics from my second prototype. A video can be seen here (it’s a prototype without a battery, for those of you bothered by the USB cable).

We’re now entering the industrialization phase, which involves finding a manufacturer and working out all the details of how to attach the components to the inside of the box (you don’t want to know how it fits, do you?).

As always, there’s the question of where to make them. For the moment, we’re talking to a Norman manufacturer (even though I’m from Brittany) and a Chinese manufacturer (even though I’m from Brittany).

The site (seriously)

May also saw the start of work on the site, the real one – not the friends’ – by Pascale Moise, who, among other things, is the author of Minimit, but who is above all a site developer. She came up with the idea of a site that opens when you press a button.
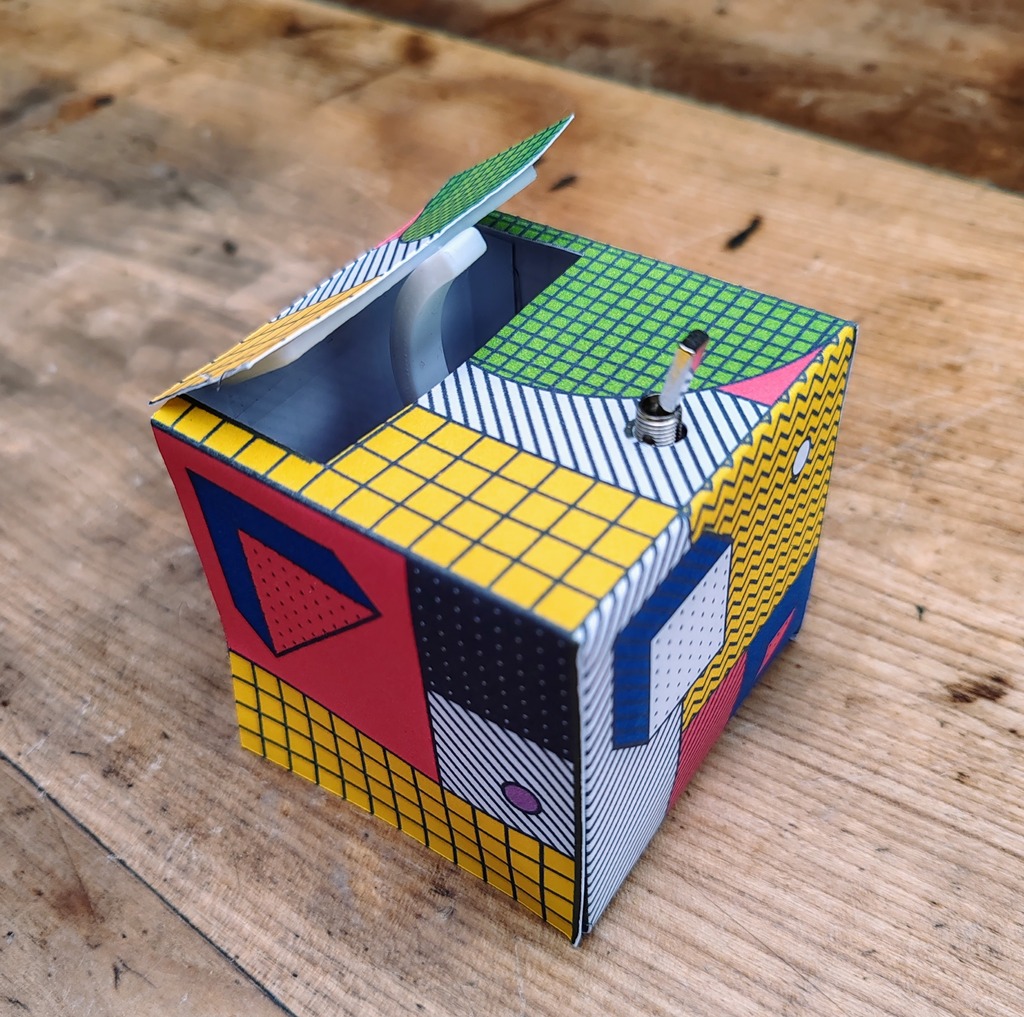
Paper toy edition

Following the various workshops mentioned above, I refined the cardboard version of the machine to make a very limited series (no more than a dozen objects, hand-crafted) for those who want to have fun right away, but above all to test out the various choreographies of movement and sound to be devised over the coming months.

It’s a do-it-yourself version, based on the same electronic architecture as the final version (but without the battery), and I imagine it will sell for around €100, with a 50% discount on the final version of the machine when it becomes available. If you’d like to know more, or if you’re interested, drop me a line!

Here’s the kit and what the cardboard machine looks like (it could become a collector’s item, who knows!).

And Lego?

Until now, Loïc has been busy finishing his Master’s degree (that’s done), and in June he began the first trials of the Lego version. We spent an afternoon working out how to integrate the motor, arm and switch, which will be done using specific 3D-printed parts. There will be around 300 parts in the kit, including of course the electronics, motor, loudspeaker, battery and… the switch.

Maker Faire

With my friend François Xavier Faucher (FXF), whom many of you know from the fabulous Toyfab blog, we decided to take a stand at Maker Faire Lille and make a giant useless box.

It’s the weekend of November 19/20, and it’s in Lille. Come one, come all!

Here’s a first idea from FXF. He knows how to do things in a big way.

Next

Now that the electronics are complete, the software already has its Github repository (all the code will be open-source), the website is well underway and the design is set, two very big issues remain: machine behavior and financing.

Behaviors

Paul has developed a behavioral description language involving arm choreography and sound sequence launch, but I haven’t had time to work on that yet. I need to have a clearer idea, if only of the artistic direction. At the moment, I’m wavering between the moo box and IRCAM: I think I’m going to have to tighten things up a bit.

There’s a lot of work to be done, because each machine is unique: the idea is to have enough sounds and behaviors so that, at the time of manufacture, we can draw a few hundred at random for each box. So we have to find a way of creating thousands of movements and sounds. This is what I’d like to test with the “Paper toy” edition.

Production financing (a.k.a. Money)

There are two types of cost in the production of electronic objects: investment costs, known in the jargon as NRE (Non Recurring Expenses), and unit costs linked to the manufacture of each machine. In the case of electronic board manufacture, there is very little investment to be made; on the other hand, in the case of plastic parts, if injection methods are used, molds have to be made, the cost of which depends on the design. And the cube design requires more complex tooling than the average.

So there are two options: finance the production myself, or sell pre-sales to cover investment and production costs. For a long time, I thought I could release the product by self-financing the project, as I did with the MiniMit. Marketing would have been really simplified: you buy it and receive it straight away. But when I calculated the investment needed to produce the machine, I realized that it wouldn’t be possible (you always need a little blindness to get started).

Unless a friend here wants to invest or help out, I’m going to go for a pre-sales system via a participatory funding campaign (Kickstarter a priori). I’m pretty familiar with these systems and this will be my sixth campaign!

A crowdfunding campaign means going from 400 friends to 5,000! The key to success is to reach your goal on the very first day, otherwise you’ll get bogged down pretty quickly, and you’ll have to pull out all the stops, which will be a real pain for everyone involved.

How do you go from 400 to 5000 friends? Well, that’s the 1,000 franc question, and if there are any digital marketing experts out there, I’d love to give you a call and have a chat, because if mechanics aren’t my forte, neither is marketing!

☀️

Thank you all for reading this far!

Let me know if you’d like a badge, if you’re interested in paper toys, and don’t hesitate to help me expand our community!

And finally, the soundtrack:

Oh, I get by with a little help from my friends
Mm, get high with a little help from my friends
Oh, I’m gonna try with a little help from my friends

With A Little Help From My Friends – The Beatles

Olivier

Le blog de la machine

Posted on

Making Of In Progress

Bonjour à toutes et à tous,

Le troisième épisode est consacré aux six derniers mois. 

Je vous préviens, c’est long ! 

Pour celles et ceux qui viennent d’arriver, le premier épisode sur l’histoire de la machine ultime est ici et le second consacré aux makers est .

Janvier

J’ai donc commencé à m’y mettre en janvier 2024. Dans la grisaille.

Avec comme vague objectif de construire un prototype permettant de montrer le côté vivant de la machine, mais avec une forme différente, inhabituelle.

Mécano (du dimanche)

Concernant la mécanique, les fichiers 3D ne manquent pas. Je m’en suis inspiré pour comprendre le mécanisme. 

C’est assez simple me direz-vous, mais la mécanique n’est pas mon fort : pendant mes études d’ingénieur, je me rappelle avoir dû étudier les plans d’un mitigeur pendant deux heures sans parvenir à comprendre où passait l’eau chaude (en revanche, j’avais fait des taches d’encre partout avec mon Rotring).

J’ai donc remis en route la Prusa et, le 12 janvier, j’ai décidé de faire ce que je ne fais jamais : suivre un cours en ligne sur Autodesk Fusion. Jusqu’ici j’utilisais TinkerCad, mais là, j’ai senti que j’allais devoir passer à la vitesse supérieure. J’ai donc consacré une quinzaine d’heures à écouter et regarder un certain Nicolasexpliquer les différentes fonctions de Fusion. 

Les premiers résultats n’étaient pas  glorieux, mais au moins je comprenais un peu comment tout cela allait fonctionner. Et j’ai décidé de n’utiliser qu’un seul moteur, alors que beaucoup de boîtes en comportent deux : l’un pour soulever le couvercle et l’autre pour repousser l’interrupteur. Les premiers essais m’ont montré qu’on pouvait faire les deux avec un seul moteur, en gardant la possibilité de créer un langage avec les mouvements d’ouverture (le côté vivant).

Un premier essai de forme… étrange

Pour échapper à la forme traditionnelle de la boîte, j’ai conçu un premier prototype à l’allure, comment dire… indéfinissable. Je crois que je venais juste de comprendre comment faire des objets en révolution avec Fusion.

Je l’ai peinte en jaune, et le bras en rose, parce qu’il y avait suffisamment de gris dehors. Le tout est en images dans cette vidéo.

Le premier problème de ce prototype était que le scotch qui tenait le couvercle provoquait inévitablement la remarque “c’est chouette mais tu vas garder le scotch, là ?”. 

Venait un second problème dû au fait que les fils qui sortaient de la boîte provoquaient inévitablement la remarque “mais il va y avoir tous ces fils, là ?”.

Ah, et j’avais aussi commencé à travailler sur une version en carton, avec une idée derrière la tête. 

Février

Premier chantier : l’électronique (le monstre)

Suite au prototype jaune, il a fallu intégrer l’électronique dans la boîte. J’ai utilisé des cartes qui contiennent déjà les composants, des breakboards que l’on relie tant bien que mal avec des petits câbles, en faisant un usage immodéré du pistolet à colle, tout en priant pour que ça fonctionne.

Second chantier : le premier prototype

Il a fallu ensuite réaliser une vraie boîte, avec un vrai couvercle garanti sans scotch, et qui permettrait d’intégrer l’électronique, le moteur, l’interrupteur et le bras. 

J’ai opté pour des charnières en laiton et j’ai testé des sons d’inspiration skeuomorphique – piste abandonnée plus tard, mais à ce moment-là, qu’est-ce que j’étais content ! Vous pouvez voir tout ça en action sur cette vidéo.

Mars

Cette première version était “good enough” comme on dit dans l’Yonne, mais l’utilisation de charnières en laiton vissées puis collées au pistocolle ne m’a pas semblé une solution élégante. En regardant des dizaines de fois des dizaines de tutoriels, j’ai fini par dessiner une charnière sans laiton et sans colle, en pur plastique. Victoire.

J’ai également retravaillé la carte électronique pour la faire passer d’un magma de fils à une carte de cartes un peu propre. C’est très simple à réaliser (j’utilise EasyEDA) et très peu cher à faire fabriquer. 

Sur cette carte, on trouve une carte avec un rp2040, un ampli audio, une carte qui transforme le 3.7V de la batterie en 5V et une carte qui permet de charger la batterie. L’ensemble fonctionne suffisamment bien pour un prototype (c’est-à-dire mal).

 Voici à quoi ça ressemble. C’est mieux, non ?

En tout cas, tous ces efforts ont permis d’aboutir enfin à un premier prototype montrable. 

Aussitôt suivi d’un autre prototype un peu plus petit qui allait faire parfaitement l’affaire. J’ai pu enfin rassembler toutes mes idées dans une première vidéo baptisée modestement “Concepts“.

J’avais réalisé une autre vidéo avec d’autres essais de sons que vous pouvez voir ici

Mon amoureuse m’a ensuite suggéré un nom pour la boîte inutile : la machine. J’ai aussitôt finalisé le logo (enfin, je lui ai trouvé une police de caractère adaptée), déposé la marque “la machine” (refusée depuis) et acheté le nom de domaine la-machine.fr.

J’ai aussi fait fabriquer des badges. Si ça vous intéresse, j’en offre aux 20 premières ou premiers qui me le feront savoir !

Avril

Elium Studio

Elium Studio est une agence de design produit : elle dessine les produits Withings, les Freebox, les afficheurs dans le métro ou les ustensiles McDo et une foule d’autres choses. Je connais Pierre Garner depuis longtemps. Je tenais à ce que ce soit Elium qui travaille sur le design de la boîte. Après consultation de son équipe, Pierre a accepté le projet et mi-avril, je sonnais chez eux pour le brief.


Les ateliers

Vous vous rappelez du prototype en carton ? J’avais une idée en tête : l’utiliser pour des ateliers avec les enfants. Chaque année, j’anime un atelier à l’école de l’Arbalète à Paris (avec mon fils Armand), au cours duquel les enfants construisent un petit objet électronique qu’ils peuvent rapporter chez eux. 

L’année dernière, c’était un petit robot fait de gobelets en plastique, qui s’allumait et tournait la tête quand on le touchait. Cette année, ils ont fabriqué une boîte inutile. 

Il a fallu concevoir plus sérieusementcette version en papier. Heureusement, je connaissais le monde des paper toys puisque j’avais déjà réalisé (avec Marc) des objets en carton avec de l’électronique dedans. Ça s’appelait reaDIYmate.

Il a fallu faire une carte électronique, acheter le matériel, ressortir la Cricut pour découper le carton et tester le montage pour vérifier qu’on arriverait à le faire en 3h. Résultat : les enfants ont pu rapporter chez eux leur boîte inutile et, pour les plus nerds d’entre eux (ou leur frères, sœurs ou parents), la reprogrammer.

Une deuxième opportunité s’est aussi présentée dans une classe de maternelle où la poétesse Séverine Daucourt était en résidence. Les enfants ont composé des poèmes qu’ils ont dis à haute voix, et les enregistrements ont été mis “dans la boîte”, pour permettre de les réentendre à l’infini

Ah, et pour les plus grands, je donne un cours à la WSF sur le design physique et cette année on a bien rigolé à faire des boîtes inutiles.

Le logiciel (sérieusement)

Fin avril, j’ai déjeuné (comme souvent) avec mon ami Paul Guyot. Pour ceux qui ne le connaissent pas, il était le directeur technique de Violet, la société liée au Nabaztag. Il a fait des tas de choses depuis, mais c’est lui qui en 2019 avait écrit en Python les services emblématiques du Nabaztag pour le kit TagTagTag. Je lui ai montré le prototype et il m’a proposé de m’aider sur le logiciel qui, bien que paraissant simple, demandait à être abordé professionnellement. 

J’étais parti sur un micro-contrôleur connu (le rp2040), mais il consomme beaucoup quand il dort. Il ronfle fort, si on peut dire. Et la consommation est un enjeu important de la boîte – je doute que les gens pensent à recharger leur machine tous les soirs. Il faut une autonomie qui se compte en mois. Paul m’a donc suggéré de prendre un autre processeur (un ESP32 C3 pour les experts) qui a l’avantage d’être peu gourmand en énergie quand il ne fait rien. Le rp2040 est anglais, le C3 est chinois. Je ne sais pas ce que qu’il faut en conclure.

Il m’a aussi incité à utiliser Erlang mais ça, il me le conseille à chaque nouveau projet. Erlang est un langage fonctionnel, proche du LISP. LISP était utilisé par les pionniers de l’IA, dont Marvin Minsky, l’inventeur de la boîte inutile. Vous suivez ? Bref, on est partis sur Erlang il ne me reste plus qu’à l’apprendre (et vous aussi). 

Paul a également proposé de donner une conférence sur la machine au festival Erlang à Berlin en octobre. Si vous êtes à Berlin le 20 octobre 2024, venez écouter  Paul : le nom de la conférence est “La Machine: The Useless Box reloaded with Erlang and AtomVM“.

Mai

Mai a été consacré en partie à l’expédition des cartes TagTagTag du lot de production 2024. Rien à voir avec la machine, même si parfois j’ai l’impression de refaire une sorte de Nabaztag : ça ne sert à rien, ça joue des sons et il y a un truc qui bouge.

Les ami.e.s

J’ai quand même eu le temps de finaliser l’appel aux ami.e.s de la machine : une vidéo et un premier site réalisés avec les moyens du bord qui m’ont pris un temps infini. En contactant les gens qui s’étaient intéressés au Nabaztag, au Minimit et à Multiplié, j’ai eu très rapidement 300 ami.e.s. Dont vous peut-être.

Interesting

Je suis allé à Londres pour assister à la fabuleuse conférence (vaguement annuelle) de Russell Davis : Interesting. J’en ai profité pour voir l’exposition d’Enzo Mari au Design Museum et visiter quelques boutiques pour repérer quels bidules électroniques inutiles occupaient le marché. Chez Selfridges, j’ai trouvé ces enceintes Bluetooth avec quelques touches de clavier et un mini-écran, tout cela à £129.95. Je me suis dit qu’avec la machine, j’avais peut être ma chance.

L’électronique (sérieusement)

Il était temps de passer aux choses sérieuses pour l’électronique. C’est là qu’est intervenu Philippe Debadier. Philippe Debadier est l’ingénieur qui a conçu l’électronique du Nabaztag il y a longtemps et des centaines d’autres cartes électroniques depuis. Il a accepté de m’aider et a réalisé celle de la machine. 

Le schéma, le routage  (le routage consiste à passer d’un schéma électrique théorique à une carte dans la vraie vie) et les prototypes sont terminés. 

Reste à tester. Merci Philippe !

Juin

Elium Studio (again)

Le 17 juin, j’avais rendez-vous avec Elium pour le rendu des premiers travaux. Je ne vais pas vous montrer toutes les pistes. Vous risqueriez d’en préférer d’autres et là, ce n’est pas le moment de douter.

Le design retenu est d’inspiration Memphis. Pas Memphis Tennessee mais le mouvement Memphis. Le groupe Memphis a été fondé dans les années 1980 autour du designer italien Ettore Sottsass (il y a un podcast sur lui ici). C’est d’ailleurs une heureuse coïncidence parce qu’il y a deux ans, j’avais vu l’exposition qui lui avait été consacrée au centre Georges Pompidou et j’avais acheté le catalogue dont le titre était “L’objet Magique”. 

Voici donc, en avant-première, le design de la machine avec de possibles déclinaisons. 

Elium a aussi réalisé un prototype fonctionnel avec les éléments électroniques de mon second prototype. Une vidéo est visible ici (c’est un prototype sans batterie pour celles et ceux que le câble USB chagrine). 

On entre désormais dans la phase d’industrialisation, qui consiste à trouver un fabricant et à étudier tous les détails de fixation des éléments à l’intérieur de la boîte (vous ne voulez pas savoir comment ça tient, là).

Comme toujours, se pose la question du lieu de fabrication. Pour l’instant, on discute avec un fabricant normand (même si je suis breton) et un fabricant chinois (même si je suis breton).

Le site (sérieusement)

En mai, a aussi débuté le travail sur le site, le vrai – pas celui des ami.e.s –, travail réalisé par Pascale Moise qui est, entre autres, l’autrice du Minimit, mais qui est surtout développeuse de sites. Elle a eu l’idée d’un site qui s’ouvre quand on actionne un bouton. 

L’édition “Paper toy”

Suite aux différents ateliers évoqués plus haut, j’ai affiné la version carton de la machine pour pouvoir en faire une série très limitée (pas plus d’une dizaine d’objets, en réalisation artisanale) destinée à celles et ceux qui veulent pouvoir s’amuser dès maintenant, mais surtout tester les différentes chorégraphies faites de mouvements et de sons à concevoir dans les prochains mois. 

C’est une version à monter soi-même, basée sur la même architecture électronique que la version finale (mais sans la batterie) et que j’imagine vendre dans les 100 € avec 50% de réduction sur la version finale de la machine quand elle sera disponible. Si vous voulez en savoir plus ou si ça vous intéresse, écrivez-moi ! 

Voici le kit et à quoi ressemble la machine en carton (ça peut devenir un collector, qui sait !).

Et les Lego ?

Loïc était occupé jusqu’ici à terminer son Master (c’est fait) et il a débuté en juin les premiers essais de la version lego. On a passé une après-midi à voir comment y intégrer le moteur, le bras et l’interrupteur, ce qui se fera avec des pièces spécifiques imprimées en 3D. Il y aura environ 300 pièces dans le kit et bien sûr l’électronique, le moteur, le haut-parleur, la batterie et… l’interrupteur. 

Maker Faire

Avec mon ami François Xavier Faucher (FXF), que beaucoup d’entre vous connaissent via le fabuleux blog Toyfab, nous avons décidé de prendre un stand à Maker Faire Lille et de réaliser une boîte inutile géante.

C’est le weekend du 19/20 novembre et c’est donc à Lille. Venez nombreux !

Voici une première idée de FXF. Il sait faire les choses en grand.

Next

Maintenant que l’électronique est terminée, que le logiciel a déjà son repository Github (l’ensemble du code sera “Open-source”), que le site est en bonne voie et que le design est figé, il reste deux très gros sujets : les comportements de la machine et le financement.

Les comportements

Paul a développé un langage de description des comportements comportant chorégraphie du bras et lancement de séquences sonores, mais je n’ai pas encore eu le temps de travailler sur cet aspect-là. J’ai besoin d’avoir les idées plus claires ne serait-ce que sur la direction artistique. Pour l’instant, j’oscille entre la boîte à meuh et l’IRCAM : il va falloir resserrer un peu je crois.

Il y a beaucoup à faire parce que chaque machine est unique : l’idée est d’avoir suffisamment de sons et de comportements pour qu’on puisse, au moment de la fabrication, en tirer au sort quelques centaines pour chaque boîte. Il faut donc trouver la façon de décliner mouvements et sons par milliers. C’est notamment ce que j’aimerais tester avec l’édition “Paper toy”.

Le financement de la production (a.k.a. L’Argent)

Dans la production d’objets électroniques, il y a deux sortes de coûts : les coûts d’investissement que l’on appelle dans le jargon les NRE (Non Recurring Expenses) et les coûts unitaires liés à la fabrication de chaque machine. Dans le cas de la fabrication de cartes électroniques, il y a très peu d’investissement à réaliser; en revanche, dans le cas de pièces plastiques, si l’on utilise des méthodes d’injection, il faut réaliser des moules dont le coût est fonction du design. Et le design en cube impose un outillage plus complexe que la moyenne.

Deux options s’offrent donc : financer moi-même la production ou réaliser des préventes qui servent à couvrir les investissements et la production. J’ai longtemps pensé que je pouvais sortir le produit en auto-finançant le projet, comme je l’ai fait pour le MiniMit. La commercialisation en aurait été vraiment simplifiée : vous l’achetez et vous le recevez tout de suite. Mais en calculant les investissements nécessaires pour produire la machine, j’ai compris que ce ne serait pas possible (il faut toujours une petite part d’aveuglement pour se lancer). 

Sauf si ici un.e ami.e veut investir ou aider, je vais partir sur un système de préventes via une campagne de financement participatif (Kickstarter a priori). Je connais assez bien ces dispositifs et ce sera ma sixièmecampagne ! 

Une campagne de financement participatif signifie ni plus ni moins qu’il faut passer de 400 ami.e.s à 5000 ! La clé du succès, c’est d’atteindre l’objectif dès le premier jour, sinon on s’enlise assez vite, il faut sortir les rames et ça devient pénible pour tout le monde. 

Comment passer de 400 à 5000 ami.e.s ? Eh bien c’est la question à 1000 Francs et s’il y a des expertes ou experts en marketing digital, je veux bien vous appeler pour papoter parce que si la mécanique n’est pas mon fort, le marketing non plus !

☀️

Merci à toutes et à tous d’avoir lu jusqu’ici !

Dites-moi si vous voulez un badge, si les paper toys vous intéressent et n’hésitez pas à m’aider pour agrandir notre communauté !

Et on termine avec la bande-son :

Oh, I get by with a little help from my friends
Mm, get high with a little help from my friends
Oh, I’m gonna try with a little help from my friends

With A Little Help From My Friends – The Beatles

Olivier